Monday, May 18, 2009

Catriona


Name: Catriona
Pattern: Catriona by Debbie Bliss
Craft: Knitting
Made for me :)
Size: Small
Started date: March 12, 2009
Completed date: May 17, 2009
Needle size: US6/4.0mm
Yarn: TLC Cotton Plus Solid
How much? 5.3 skeins (525g, 943.4yards/862.6m)
Colorway: Hot Pink
Modifications: 1. Twisted rib 2. Picked up fewer stitches for the neckband and armbands
See the project on Ravelry!

My first sweater! Ok, I lied...this isn't my first sweater, but it is my first sweater in a long time. I used to knit sweaters when I was younger (in my teens), but never wore them so I stopped knitting sweaters for awhile. I saw so many beautiful sweaters on Ravelry that I decided to start again. So this is my first completed sweater in a long time! I'm happy with how it turned out and will wear it occasionally.

I bought this yarn at the Coats and Clark Canada Outlet Clearance Store. It was $1/skein. I decided to start knitting clothes with cheap yarn at first (in case I don't end up wearing it). I really like the colour- perfect for a spring/summer top!

As for modifications, I decided to knit twisted rib instead of regular ribbing. I think it gives the top a bit more structure. I also picked up fewer stitches around the neckband and armband to make sure it stayed flat when I wear it instead of ruffling.

Overall, I'm happy with how it turned out. Let's hope that I actually start wearing the clothes I knit!

Sunday, May 10, 2009

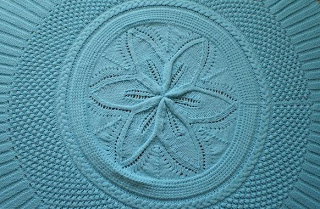
Botanica Medallion Baby Blanket

Name: Botanica Medallion Baby Blanket
Pattern: #04 Botanica Medallion Cardigan by Shiri Mor
Craft: Knitting
Made for Alba
Size: 34 inch diameter
Started date: April 14, 2009
Completed date: May 4, 2009
Needle size: US6/4.0mm
Yarn: Bernat Baby Sport Solid
Colour: Popsicle Blue
How much? 0.63 skeins (220g, 701.2 yards/641.2m)
Modification: 1. Turned a cardigan pattern into a baby blanket
2. Modifications made to the border (see below for the pattern)
See the project on Ravelry!


This project should be named as the "when dreams come true" project. This summer I applied for a job at the Hospital for Sick Children. It was very competitive. Hundreds of applicants and only 30 positions. I was obsessed with getting this job. It was all I thought about for two months. On April 14th, I was told that I would get the call to let me know if I would be offered the job or not. So on April 14th, I sat on my couch with my phone waiting for the call. I was panicking and decided that I needed to do something to keep myself from going crazy while I waited. When I saw the cover of the Vogue Knitting Spring/Summer 2009, I knew that I had to make this because it looked like it would be a fun knit. However, I thought the cardigan was a bit too eclectic for my taste because I am pretty conservation/classic with my clothes. So what I decided to do was to convert this cardigan into a baby blanket.

This was in fact a very fun knit as I had expected. About a few rows into this pattern, I instantly felt very relaxed. Then all of a sudden, my phone rang and I was offered the job! I was out of this world happy! I spent the rest of the day knitting the center while I waited for Jim to come over so we can go out to celebrate. The center was very quick to knit and I was able to finish it the same day. It required blocking to get it in a nice circular shape.

At first, I followed the pattern for the border. However, I did not like the Indian stitch in the pattern because it was time consuming and looked a bit sloppy (maybe my knitting was to blame). Also, it was very "holey" and I could see Alba sticking her little fingers through the holes and perhaps ripping the blanket. So I decided to make some modifications to the border.

Here is the pattern that I used for the pattern:
Abbreviations:
K= knit
M3= (k, p, k) into the next stitch
P= purl
P3tog= purl 3 together

Cast on 70sts.
Row 1: Knit as instructed in the original pattern for the first 22 sts, (M3, P3tog) 6 times, K24
Row 2: P48, knit as instructed in the original pattern for the last 22 sts
Row 3: Knit as instructed in the original pattern for the first 22 sts, (P3tog, M3) 6 times, K24
Row 4: P24, turn
Row 5: K24, turn
Row 6: K24, turn
Row 7: P24, turn
Row 8: K24, P24, knit as instructed in the original pattern for the last 22 sts

Knit the border so that the length of the border is the same as the circumference of the center. I used whipstitch to join the border with the center as I knitted, so that way my border fits perfectly around the center instead of being too short or two long. When it was the right length, I cast off on row 8 then sewed the two ends of the border together.

This blanket required blocking to make sure it was in a nice circular shape. Overall, I was very happy with the results. I absolutely love the colour of this blanket. I am also much happier with this pattern as a baby blanket than a cardigan.